
This is a deconstruction of techniques I used to turn photographic images into a comic strip, using only filters and adjustment layers, with the final result emulating ink on gouache. Photoshop familiarity is recommended for this demonstration.
Step 1: Modifying the photos
The original images are screen captures of a scene from the TV sitcom, Parks & Recreation. For Step 1, all three panels are processed individually.

Shadows/Highlights
Image > Adjustments > Shadows/Highlights pulls shadows closer to the midtone range while also slightly flattening color gradations. This is a great starting point since these images are dark and muted.

Levels
Color levels were adjusted with Auto Tone Image > Auto Tone, then the Levels dialog box Image > Adjustments > Levels.... This neutralizes shadow & highlight tones, and brightens midtones.

Unsharp Mask
The line art effect takes shape with Unsharp Mask Filter > Sharpen > Unsharp Mask... at a very high setting. This creates a “halo” effect around edge detail, which forces adjacent pixels to increase contrast. In other words, edges around objects become dramatically pronounced, which gives the appearance of inked line art.

Color adjustment layers
I took a couple of extra steps to make the subject more distinctive. The background and jacket were masked, then adjustment layers applied to both.

These steps are repeated for the other two panels.
Action enhancements
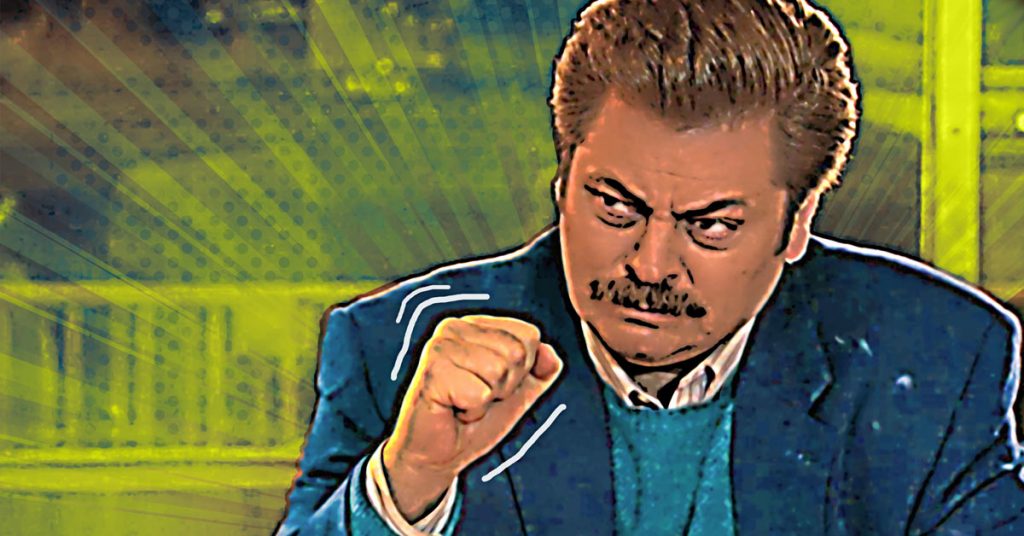
Ron Swanson pumps his fist in triumph after his absurd demand is granted, so we’re driving that point home by highlighting the action. For this, a couple of vector graphics were added over the background.

Action elements layer blending
The dots and rays look pretty lame as-is, so I blended these layers Layer > Layer Style > Blending Options... into the background. Photoshop’s layer blending capabilities are a powerful tool for mixing foreground and background objects without requiring complicated masks or filters.
I kept the color palette fairly simple for this comic strip: mostly blues, greens, and yellows. To offset Ron Swanson’s blue jacket, I added a yellow-green color overlay Layer > New Fill Layer > Solid Color... above the background graphics, and blended through all three channels (red, green and blue) to mix it in with underlying elements.

Step 2: Assembling the story
Create a new document
Everything is put together in a new layout document: File > New.... I replicated newspaper with a new fill layer Edit > Fill.... I gave this an off-white color and light paper texture with a pattern Layer > Layer Style > Pattern Overlay....

Laying out the story panels
Next, each panel was copied into the comic strip panel:
Select > All, Edit > Copy Merged, then Edit > Paste.
Then they were resized, cropped with layer masks, aligned, and outlined with a layer stroke. Sizing and layout proportions take experimentation, so Image > Canvas Size... and the Crop Tool were used to make adjustments.

Creating speech balloons
The Text and Shape tools were used to add speech balloons.

Creating a title panel
Next, I designed a title panel. This was assembled using a combination of a photo, filters, adjustment layers, shape layers, type, and layer masking.

Step 3: Finishing touches
Action is louder than words
A couple of enhancements for the last panel make it a little more dynamic. First, I wanted to have Ron Swanson’s head extend out of the frame: in the original video still the top of his head is cropped out, but this is made possible by cloning details from the first frame and adjusting as needed.
Also, stink lines were added on a separate layer to accentuate the fist pump, using the Brush Tool.

Emulating offset printing on newspaper
Finally, I added two more layers to emulate the look of a printed comic. For 4-color process offset printing, anything that is white is really the substrate. Newspaper is also pretty absorbent, so paper fiber shows through. This was easily accomplished by copying the paper texture layer, and positioning above all other layers.
Also, I added a mask to the second panel’s speech balloon to recede it into the frame. Skip doesn’t have strong opinions; he just works here.

The final product
And there you have it: the tale of a hangry dude at a greasy spoon, told in comic strip form. I hope this demonstration was interesting; let me know what you think!
